ShopDreamUp AI ArtDreamUp
Deviation Actions


![atlas [CHRONIC series]](https://images-wixmp-ed30a86b8c4ca887773594c2.wixmp.com/f/0e44bc25-346e-4b0e-9289-742439b5b520/ddrbfsn-427f07a7-2e0f-44e9-a87e-a5c58049d6ad.png/v1/crop/w_92,h_92,x_14,y_0,scl_0.0368,q_70,strp/atlas__chronic_series__by_curiositykilled18_ddrbfsn-92s.jpg?token=eyJ0eXAiOiJKV1QiLCJhbGciOiJIUzI1NiJ9.eyJzdWIiOiJ1cm46YXBwOjdlMGQxODg5ODIyNjQzNzNhNWYwZDQxNWVhMGQyNmUwIiwiaXNzIjoidXJuOmFwcDo3ZTBkMTg4OTgyMjY0MzczYTVmMGQ0MTVlYTBkMjZlMCIsIm9iaiI6W1t7ImhlaWdodCI6Ijw9NjQwIiwicGF0aCI6IlwvZlwvMGU0NGJjMjUtMzQ2ZS00YjBlLTkyODktNzQyNDM5YjViNTIwXC9kZHJiZnNuLTQyN2YwN2E3LTJlMGYtNDRlOS1hODdlLWE1YzU4MDQ5ZDZhZC5wbmciLCJ3aWR0aCI6Ijw9MTAyNCJ9XV0sImF1ZCI6WyJ1cm46c2VydmljZTppbWFnZS5vcGVyYXRpb25zIl19.exqQOBic4lyIblYRTbkxasFRVMV8L1bzxpb2FEmDG_Y)
![champion [CHRONIC series]](https://images-wixmp-ed30a86b8c4ca887773594c2.wixmp.com/f/0e44bc25-346e-4b0e-9289-742439b5b520/ddrbcgf-6a1bf390-6eed-417f-8b0c-1089d2083710.png/v1/crop/w_92,h_92,x_0,y_46,scl_0.0368,q_70,strp/champion__chronic_series__by_curiositykilled18_ddrbcgf-92s.jpg?token=eyJ0eXAiOiJKV1QiLCJhbGciOiJIUzI1NiJ9.eyJzdWIiOiJ1cm46YXBwOjdlMGQxODg5ODIyNjQzNzNhNWYwZDQxNWVhMGQyNmUwIiwiaXNzIjoidXJuOmFwcDo3ZTBkMTg4OTgyMjY0MzczYTVmMGQ0MTVlYTBkMjZlMCIsIm9iaiI6W1t7ImhlaWdodCI6Ijw9MzA3MiIsInBhdGgiOiJcL2ZcLzBlNDRiYzI1LTM0NmUtNGIwZS05Mjg5LTc0MjQzOWI1YjUyMFwvZGRyYmNnZi02YTFiZjM5MC02ZWVkLTQxN2YtOGIwYy0xMDg5ZDIwODM3MTAucG5nIiwid2lkdGgiOiI8PTEwMjQifV1dLCJhdWQiOlsidXJuOnNlcnZpY2U6aW1hZ2Uub3BlcmF0aW9ucyJdfQ.fDYbALi-NQVtQIrCjEwter1XaNXK8bgCRpxo2uoALPc)

![stomach ache [CHRONIC series]](https://images-wixmp-ed30a86b8c4ca887773594c2.wixmp.com/f/0e44bc25-346e-4b0e-9289-742439b5b520/ddrbfmq-25586329-ae97-48a8-8e7b-5e8770f33223.png/v1/crop/w_92,h_92,x_0,y_13,scl_0.026285714285714/stomach_ache__chronic_series__by_curiositykilled18_ddrbfmq-92s.png?token=eyJ0eXAiOiJKV1QiLCJhbGciOiJIUzI1NiJ9.eyJzdWIiOiJ1cm46YXBwOjdlMGQxODg5ODIyNjQzNzNhNWYwZDQxNWVhMGQyNmUwIiwiaXNzIjoidXJuOmFwcDo3ZTBkMTg4OTgyMjY0MzczYTVmMGQ0MTVlYTBkMjZlMCIsIm9iaiI6W1t7ImhlaWdodCI6Ijw9MTYxMCIsInBhdGgiOiJcL2ZcLzBlNDRiYzI1LTM0NmUtNGIwZS05Mjg5LTc0MjQzOWI1YjUyMFwvZGRyYmZtcS0yNTU4NjMyOS1hZTk3LTQ4YTgtOGU3Yi01ZTg3NzBmMzMyMjMucG5nIiwid2lkdGgiOiI8PTEwMjQifV1dLCJhdWQiOlsidXJuOnNlcnZpY2U6aW1hZ2Uub3BlcmF0aW9ucyJdfQ.bO27PIDMecowcgCbTVseds4gku54YODeL3pycJWb720)
![headache [CHRONIC series]](https://images-wixmp-ed30a86b8c4ca887773594c2.wixmp.com/f/0e44bc25-346e-4b0e-9289-742439b5b520/ddrbfhe-8e566db2-7b63-42d4-8561-befda3560ebc.png/v1/crop/w_92,h_92,x_18,y_0,scl_0.020909090909091,q_70,strp/headache__chronic_series__by_curiositykilled18_ddrbfhe-92s.jpg?token=eyJ0eXAiOiJKV1QiLCJhbGciOiJIUzI1NiJ9.eyJzdWIiOiJ1cm46YXBwOjdlMGQxODg5ODIyNjQzNzNhNWYwZDQxNWVhMGQyNmUwIiwiaXNzIjoidXJuOmFwcDo3ZTBkMTg4OTgyMjY0MzczYTVmMGQ0MTVlYTBkMjZlMCIsIm9iaiI6W1t7ImhlaWdodCI6Ijw9NTgyIiwicGF0aCI6IlwvZlwvMGU0NGJjMjUtMzQ2ZS00YjBlLTkyODktNzQyNDM5YjViNTIwXC9kZHJiZmhlLThlNTY2ZGIyLTdiNjMtNDJkNC04NTYxLWJlZmRhMzU2MGViYy5wbmciLCJ3aWR0aCI6Ijw9MTAyNCJ9XV0sImF1ZCI6WyJ1cm46c2VydmljZTppbWFnZS5vcGVyYXRpb25zIl19.HZFfe2gNTJpNvpL3lMQ2CtVxrR2b6_0GbjFNXkckPGw)
![your legs won't carry you [CHRONIC series]](https://images-wixmp-ed30a86b8c4ca887773594c2.wixmp.com/f/0e44bc25-346e-4b0e-9289-742439b5b520/ddrbcoy-e90f3f69-8b58-41ea-99b3-28f579e642b6.png/v1/crop/w_92,h_92,x_14,y_0,scl_0.0368,q_70,strp/your_legs_won_t_carry_you__chronic_series__by_curiositykilled18_ddrbcoy-92s.jpg?token=eyJ0eXAiOiJKV1QiLCJhbGciOiJIUzI1NiJ9.eyJzdWIiOiJ1cm46YXBwOjdlMGQxODg5ODIyNjQzNzNhNWYwZDQxNWVhMGQyNmUwIiwiaXNzIjoidXJuOmFwcDo3ZTBkMTg4OTgyMjY0MzczYTVmMGQ0MTVlYTBkMjZlMCIsIm9iaiI6W1t7ImhlaWdodCI6Ijw9NjQwIiwicGF0aCI6IlwvZlwvMGU0NGJjMjUtMzQ2ZS00YjBlLTkyODktNzQyNDM5YjViNTIwXC9kZHJiY295LWU5MGYzZjY5LThiNTgtNDFlYS05OWIzLTI4ZjU3OWU2NDJiNi5wbmciLCJ3aWR0aCI6Ijw9MTAyNCJ9XV0sImF1ZCI6WyJ1cm46c2VydmljZTppbWFnZS5vcGVyYXRpb25zIl19.Q1_OEb8pzBCyAjocH4eEF1U_y2jNDxaixi2YRjE8F78)


Description
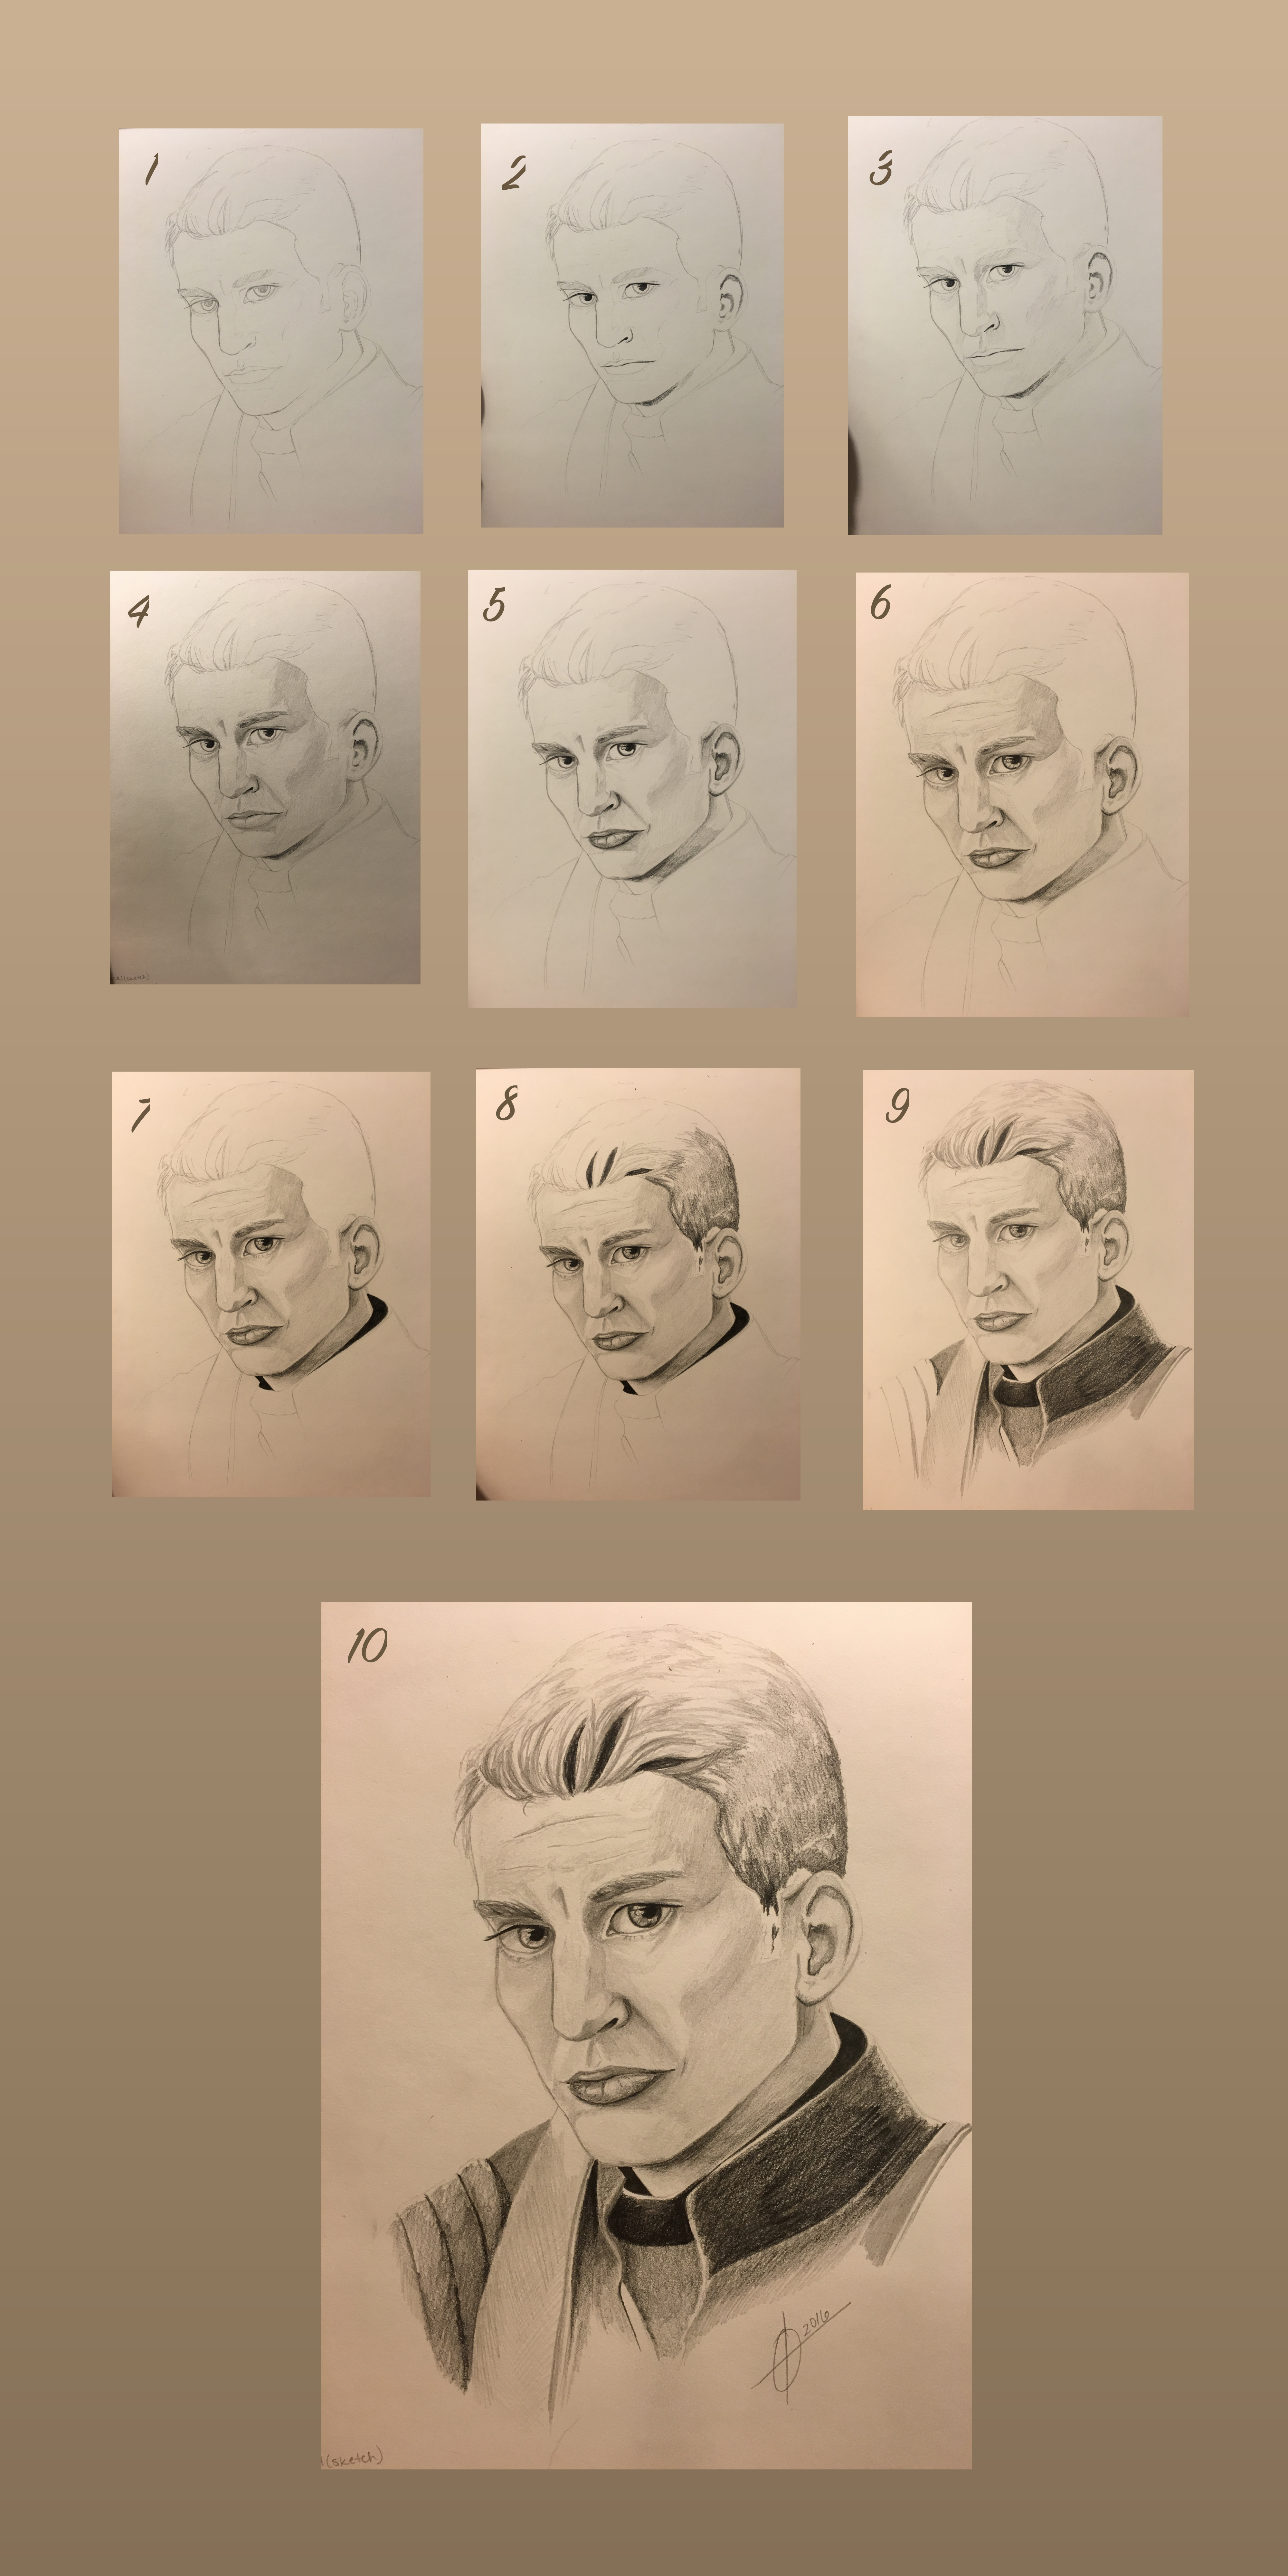
This has to be the shittiest tutorial ever. I am so sorry. But hey, trying something new!
Anyway, this is for nicho1991 - I realized it had been so long since I really did a traditional piece that I couldn't remember exactly what technique I used. Hopefully, it's helpful to some other people, too.
Before you get started, make sure you have a solid reference - or a few. It's really helpful to get several images of your subject from different angles so that you start to build a 3D view of them rather than just copying what you see before you. (For this, I confess, I only used multiple references for his hair. Whoops.)
Step-by-step:
(1) I usually do my sketch in mechanical pencil. It's a pretty quick sketch - more of a roadmap than anything else. You should be able to see some marks noting shading (look around the cheek, eyes, and mouth) and later work (very faint arrows at the top showing the direction of the hair). This is usually a really clear signal to me how the portrait will go and what problem areas are going to be. In this case, the left (from the viewer's standpoint) side of the face was a huge struggle - the eye was too small, the eye was too big, the cheekbone looked like a deformity, the cheekbone disappeared - you get it. That held true all the way through.
(2) I almost always start shading by making "pick points" - pieces of the portrait that are fairly dark and won't need a lot of blending. The pupils, eyelashes, nostril(s), and eyebrows are usually my go-tos. Here, you can see under the chin and within the ear as well. This step is always with a 2B pencil.
(3) Here, I go light. With a 2H pencil, I shade very lightly over the big regions of shadow - under the cheekbone, up by the forehead, near the chin. The key for me is to focus on very soft, quick, low pressure strokes: I'm just setting up a base to build on, really.
(4) With an HB pencil, I went in and darkened his eyebrows - they were getting pretty faint and, as a prominent feature, needed to stand out a little more to guide the rest of the drawing. Then, I took an H pencil and started working over the areas that previously had 2H: darkening his cheek and near his eye, starting shading on his lips, extending the crease beside his nose. Again, I focused on short, light strokes often in a circular pattern to gently increase shading and depth.
(5) With a 2B pencil again, I focused on the lips, eyes, neck, and ear. On the lips, neck, and ear, I once again used soft, short strokes, but I used a lot of pressure to get the dark regions of the eyes.
(6) Here, I started getting distracted by the drawing instead of marking my steps, so it's a bit of a combination of steps. First, I took an HB pencil back over the ears and cheek (specifically right under the arch of the cheekbone and in the creases of the ear). Then, I took H and 2H pencils everywhere. Again, really light, gentle strokes. I kept referring back to my reference to see how the light was playing on his skin and how dark/light it was in each region.
(7) Just to ground the piece which I worked on it, I added the inner collar with a 6B pencil before returning to the eyes and eye area. Here, I used a lot of pressure with that 6B to darken the pupils and then used very soft strokes and almost taps to add some depth to the irises. Then I switched to an HB (I think) to add some detail to the irises and eyebrows. Shading the eyes is an entire other tutorial/walk-through, but you should be able to get some ideas by closely examining your reference.
(8) Missed a few steps in here, clearly.
8a) I took B, 4B, and 6B pencils to start on his uniform. All three were used with very low pressure, gentle, short strokes to create the fabric of the collar and undershirt. The darker regions were made so through layering: B, then 4B, then HB, or some variation thereof. The most important part is to start with some B pencil (B, 2B, 4B, etc). This helps give it a very different texture than the skin while also allowing for a range of shades.
8b) The leather straps, on the other hand, are only H, 2H, and HB. Leather is skin, so it should have a much more similar feel to the face than the kevlar/cloth uniform does. I was moving pretty quickly over these and didn't really pay a lot of attention to them, so they're pretty messy.
8c) The hair, like the fabric, started with B but has a little bit of a lot in it. The darkest regions (found by looking, again, at my reference) are 6B with smaller strands pulled out in 2B and HB. From there, B and 2B help build the gradient that is then topped with H and 2H. You'll notice a lot of white space up here: since Rogers is blond, you can use the white of the paper as highlights rather than trying to outline each individual hair or erase once you've already shaded over it. Though, to be honest, I'm just really lazy and this is easier than that.
(9) Starting to look like a finished piece! Continued to add some hair detail with H and HB but mostly focused on the outfit. B and 4B were used to shade in his shoulder while I went back to H and HB for the leather.
(10) And we're done! The only real changes here are the camera angle and taking an HB pencil over to his hairline by his ear to shade that in a little bit. Otherwise, this is basically the same as step 9.
Overall thoughts:
- His left cheek should be less visible, I think. Right now, it makes his face feel too broad.
- There shouldn't be such a dark, hard line under his bottom lip.
- Leather straps could use actual attention rather than scribbles.
- The hair feels very unfinished. The transition from the front of the hairline back into his head is very choppy and doesn't feel right.
- Shading is about layers: you start with a big base and gradually narrow and darken to the details.
If you made it all the way through this, congrats! Hope it helps, and feel free to ask questions, leave comments, or make recommendations. I'm all ears
Image size
4000x8000px 21.52 MB
© 2016 - 2024 curiositykilled18
Comments4
Join the community to add your comment. Already a deviant? Log In
a little tip i noticed tho ") the bottom lip is slight of angle
the bottom lip is slight of angle  (Wink)")
i will definitly try to apply these techniqus to my next drawing, again thanks a lot (Smile)")
i will definitly try to apply these techniqus to my next drawing, again thanks a lot